Prefab UI Dashboard
An interactive CAD design assistant with real-time SolidWorks integration. Click buttons to call GitHub Copilot for design planning, execute checkpoints, and sync the 3D viewport.
For a complete control-by-control mapping (every button/input to endpoint/service), see docs/getting-started/prefab-ui-controls-reference.md.
For current pass/fail accounting of each visible control and component, see docs/getting-started/prefab-ui-validation-matrix.md.
For a tested end-to-end example using local Gemma inference and the SolidWorks U-Joint sample bracket, see docs/getting-started/prefab-ui-u-joint-bracket-runbook.md.
Features
- Design Intent Pane (wider left side): Edit goals, ask clarifying questions, classify the design family
- Target Model Pane: Attach a concrete
.sldprt/.sldasmpath and grounded feature targets such as@Boss-Extrude1 - Assumptions + Model Controls: Persist provider/profile/local endpoint choices for
pydantic-ai - Checkpoint Queue (middle): Reviewable workflow steps with one-click execution (adapter-backed for supported tools)
- 3D Model View (larger right pane): Real-time PNG preview synced every ~3 min or manual refresh with orientation buttons (Isometric/Front/Top/Current)
- Manual Sync Detection: Capture before/after snapshots and detect manual edits
- Evidence Retrieval: Track LLM sources and design decisions
- Context Window Monitor: Approximate prompt-budget usage for goal, assumptions, model context, docs context, and notes (advisory currently)
Layout
The dashboard uses an 8-column responsive grid:
- Left (3 cols): Design intent + family classification gate
- Left (3 cols): Design intent + target model + assumptions/model controls + BYO references + family checkpoint
- Middle (3 cols): Checkpoint queue + context window + evidence table + manual sync
- Right (2 cols): 3D model view pane with orientation controls
Workflow modes
Use one of these workflows depending on how much UI you want:
MCP server only
- Start the MCP server and drive everything from chat or tool calls.
- Best when you already know the exact tool sequence.
- Recommended for scripted tests and low-level debugging.
UI workflow
- Start the FastAPI backend plus Prefab dashboard.
- Attach a target model, inspect, plan, and execute from the UI.
- Best for guided, human-in-the-loop editing and provenance review.
Hybrid workflow
- Use the UI to ground intent, attach the active model, and inspect evidence.
- Use MCP/chat for specialized operations or direct tool invocation.
- Return to the UI for preview refresh, manual sync, and checkpoint review.
Control reference
Use docs/getting-started/prefab-ui-controls-reference.md as the authoritative map for:
- every textbox/button/row click action in the dashboard
- expected visual feedback after each action
- backend endpoints and service functions hit by each control
- controls that are implemented in backend but not currently surfaced in the dashboard
Design Spec and Model Settings: what to enter
This card controls how planning prompts are formed and which model provider handles Clarify/Inspect/Go actions.
- Design goal textbox:
- Enter the target outcome in one concise paragraph.
- Include what should be created or changed, critical dimensions, and what "done" means.
- Example: "Design a vented electronics bracket with two M4 mounting ears and >=2.5 mm wall thickness."
- Assumptions textbox:
- Enter manufacturing assumptions and constraints.
- Include material, layer height, nozzle size, clearance/tolerance targets, print orientation, and any keep-out constraints.
- Example: "PETG, 0.2 mm layers, 0.4 mm nozzle, 0.30 mm mating clearance, avoid >45 degree unsupported overhangs."
- Provider buttons:
Provider: GitHubroutes structured planning calls to GitHub Models.Provider: Localroutes structured planning calls to your local OpenAI-compatible endpoint (for example Ollama).- Profile buttons:
Small/Balanced/Largetune the default model recommendation and latency/quality tradeoff.- Model name textbox:
- Use provider-qualified names when possible.
- Examples:
github:openai/gpt-4.1,local:gemma4:e4b. - Local endpoint textbox:
- Only used when provider is local.
- Typical value:
http://127.0.0.1:11434/v1. - Local model controls:
Auto-Detect Local Modelprobes Ollama, picks a supported local tier, updates the endpoint, and writes a provider-qualified local model name into the form.Pull Recommended Modeltriggers the Ollama pull for the recommended tier and shows in-UI status while the download is running.- These controls are the intended fix path when Clarify/Inspect fail with errors like
model 'llama3.1' not found.
What the context window monitor means
- The context window meter is an operator hint, not a hard tokenizer-backed quota.
- It summarizes how much prompt budget is being consumed by the current goal, assumptions, attached model context, docs context, and engineering notes.
- Today it is useful for understanding why the second column may get noisy or overloaded, but it does not yet enforce truncation or exact token accounting.
Setup references:
- SolidWorks MCP setup in VS Code: getting-started/vscode-mcp-setup.md
- Local Ollama/Gemma setup: getting-started/local-llm.md
- Backend API/OpenAPI docs when running locally: http://127.0.0.1:8766/docs
What the preview pane does and doesn't do
Current approach (PNG export):
- Asks the backend to call
export_image(view_orientation=...)from the active SolidWorks adapter - Serves the PNG into the dashboard with Isometric/Front/Top/Current orientation buttons
- Refreshes manually or on a timer every 3 minutes
Future work (not yet implemented):
- 3D viewport streaming with real-time camera sync
- STL export alongside PNG for richer 3D representation on sketches
Install UI dependencies
From the repo root:
Start the backend
Run the local JSON backend first:
.\.venv\Scripts\python.exe -m uvicorn solidworks_mcp.ui.server:app --host 127.0.0.1 --port 8766 --reload
The backend exposes state, planning, preview, target-model, and retrieval-ingestion endpoints that correspond to the dashboard cards.
The backend is implemented with FastAPI, so local endpoint docs are available at http://127.0.0.1:8766/docs.
Start the Prefab frontend
In a second terminal:
The frontend will connect to http://127.0.0.1:8766 by default.
You can override the API origin:
$env:SOLIDWORKS_UI_API_ORIGIN = "http://localhost:8766"
.\.venv\Scripts\prefab.exe serve src/solidworks_mcp/ui/prefab_dashboard.py
Legacy launch path (still works):
LLM button requirements
The Clarify and Inspect buttons use GitHub Copilot (openai/gpt-4.1) via PydanticAI.
You must provide one of:
GH_TOKENenvironment variableGITHUB_API_KEYenvironment variable with models:read scope- an authenticated
gh auth loginsession (the backend queriesgh auth tokenas fallback)
Override the model if needed:
$env:SOLIDWORKS_UI_MODEL = "github:openai/gpt-4.1"
.\.venv\Scripts\python.exe -m uvicorn solidworks_mcp.ui.server:app --host 127.0.0.1 --port 8766
Local open-weight routing:
- Save assumptions/model settings in the UI with:
- provider =
local- profile =small/balanced/large- model name = for examplelocal:gemma4:e4b- local endpoint = for examplehttp://127.0.0.1:11434/v1 - Clarify/Inspect actions will route through
OpenAIProvider(base_url=...)against the configured local endpoint. - If the current model field contains an unsupported local name, click
Auto-Detect Local Modelin the UI before retrying Clarify/Inspect.
Preview pane requirements
For the 3D view pane to sync:
- SolidWorks running with an active part or assembly
- Valid adapter (pywin32 adapter on Windows with COM support)
- Model file in memory (not needed at startup, but required for export_image to work)
The dashboard now attempts to reopen the attached target model before preview export. In practice, the most reliable flow is:
- Attach the target model path in the UI.
- Confirm SolidWorks opened it successfully.
- Click
Refresh 3D View.
If the attached model context reports features 0, the dashboard now shows an inline warning under Feature targets explaining that grounded refs cannot resolve until the adapter can read the active feature tree.
Working on a saved model
If you already have a part such as:
use the UI like this:
- Paste that path into
Target Model. - Optionally add a grounded feature target, for example
@Boss-Extrude1or@Sketch1. - Click
Attach Model and Inspect. - Review the detected family, feature-target grounding status, and preview pane.
- Then click
Go: Plan Next Stepsto ask the planner how to extend the existing model.
That is how you tell the model, in a grounded way, which SolidWorks file it should operate on and which feature region it should focus on.
BYO retrieval ingestion
The current scaffold is path-based rather than browser-upload based:
- Paste the absolute path to a PDF, markdown, or text reference source.
- Enter a namespace such as
box-howtoormachinery-book-ch2. - Click
Ingest Reference Source. - The backend writes a simple local JSON retrieval index under
.solidworks_mcp/rag/and stores provenance in session state.
This is intentionally copyright-safe: only user-provided files are ingested.
Preview images are stored in: .solidworks_mcp/ui_previews/
The pane auto-refreshes every 3 minutes (SetInterval 180000ms) or on manual click.
Button integration status
✅ Fully Hooked Up + Working
- Approve Brief: Saves goal → SQLite session
- Attach Model and Inspect: Opens a target SolidWorks file, inspects features, validates feature-target refs, and seeds family evidence
- Ask Clarifying Questions: Calls GitHub Copilot → returns normalized brief + Q&A
- Inspect More: Calls GitHub Copilot → returns family, confidence, evidence, warnings, checkpoints
- Ingest Reference Source: Builds a simple retrieval JSON index from a local PDF/text source
- Accept Family: Updates session → persists family choice
- Execute Next Checkpoint: Runs supported adapter tools (
create_sketch,add_line,create_extrusion,create_cut/create_cut_extrude) and logs each tool result - Refresh 3D View: Calls
export_image()→ PNG → preview pane; supports Isometric/Front/Top/Current - Run Diff + Reconcile: Compares snapshots → reports manual changes +.3+-- **Approve Brief*: Explicitly accepts the current design goal into the session brief
🔧 MOCKED (Clearly Marked In App + Code)
check_interferencecheckpoint tool: Marked asMOCKEDin checkpoint tool results until tool-layer wiring is added- Live 3D viewport streaming / STL embedding in UI: Marked as
MOCKEDin the 3D pane; current implementation uses PNG export refresh
📋 Implemented In Backend, Not Currently Surfaced In This Dashboard
POST /api/ui/rag/ingest(BYO ingestion route exists but no dedicated dashboard button at present)GET /api/ui/debug/session(debug endpoint)POST /api/ui/local-model/pullandPOST /api/ui/local-model/query(local model ops)
📋 Planned or Partial
- Tool-layer
check_interferenceexecution from checkpoint runner - Enrich model state capture (currently snapshot-first)
- Real-time viewport streaming (would need viewport API exposure)
Architecture notes
Backend (src/solidworks_mcp/ui/server.py):
- FastAPI app with typed request models, CORS middleware, and built-in OpenAPI docs
- State, planning, target-model, retrieval-ingestion, preview, and manual-sync endpoints + static file serving for preview images
- All async for LLM calls
Service (src/solidworks_mcp/ui/service.py):
- State management via SQLite (session + checkpoints + evidence + snapshots)
- LLM integration via
_run_structured_agent()with PydanticAI - Adapter factory for SolidWorks COM calls (export_image, etc.)
Dashboard (src/solidworks_mcp/ui/prefab_dashboard.py):
- Prefab UI framework with reactive state binding
- Fetch actions for all buttons
- SetInterval timers for auto-refresh (3 min) and context animation (500ms)
Troubleshooting
Preview pane shows "No preview captured yet":
- Attach a target model first, then click
Refresh 3D View - Confirm the configured adapter is
pywin32rather thanmock - Check that SolidWorks COM is available:
.venv\Scripts\python.exe -c "import pywin32_loader; from win32com.client import GetObject; print(GetObject(Class='SldWorks.Application'))"
LLM buttons fail with auth error:
- Verify
gh auth loginor setGH_TOKEN:.venv\Scripts\python.exe -c "import os; print(os.getenv('GH_TOKEN', 'NOT SET'))" - If using GitHub Models for the first time, ensure your gh CLI session has models:read scope
Checkpoint execution partially mocked:
- Most checkpoint tools run through the adapter now.
- If a tool has no adapter binding (for example
check_interference), the app marks itMOCKEDin the queue details and keeps the message explicit.
Feature target did not ground:
- Use the exact feature-tree name, for example
@Boss-Extrude1 - Re-attach the model after changing feature targets so the UI can revalidate them against the active tree
- If you see the inline grounding warning and the local model context summary says
features 0, the attach succeeded but the feature tree was not readable for that model context yet.
Local model routing failed with model not found:
- Open
Design Spec and Model Settings - Click
Auto-Detect Local Model - If Ollama is reachable but the recommended tier is not downloaded yet, click
Pull Recommended Model - Re-run
Auto-Detect Local Model, then retryRefresh ClarificationsorInspect More
PDF ingestion failed:
- Use a text or markdown file first, or install
pypdfin the environment before ingesting PDF sources
Next steps
- Start both services as shown above in separate terminals
- Attach your target model and optionally a feature target like
@Boss-Extrude1 - Edit the design goal and click
Approve Brief - Optionally ingest a how-to or book excerpt into a retrieval namespace
- Click
Ask Clarifying Questionsto see normalization - Click
Go: Plan Next StepsorInspect Moreto classify the current model and generate checkpoints - Accept Family once you're happy with the classification
- Refresh 3D View to see the current SolidWorks viewport
- Use orientation buttons to switch between Isometric/Front/Top/Current views
Demo: run an example part flow
Use this as a repeatable demo scenario:
- Start backend and Prefab UI as described above.
- In lane 1, paste a model path such as:
- Enter feature targets (optional), for example
@Boss-Extrude1. - Click Attach Local Path.
- Click Refresh 3D and then Isometric / Front / Top.
- Click Plan Next Steps, then Accept Approach.
- Click Execute Next Checkpoint and review checkpoint status changes.
- In the feature table, click one row and confirm viewer/selection update.
- Save context with name
prefab-dashboard, then load it back to confirm round-trip persistence.
If .generated\part_1.sldprt is not present in your local workspace, use any existing .sldprt/.sldasm path you already open in SolidWorks (cupcake).
Walkthroughs With Screenshot Callouts
Use these two guided walkthroughs when documenting demos or onboarding users. For each step:
- Capture a screenshot.
- Add numbered callout boxes around the referenced controls.
- Validate the expected state update below the screenshot.
Walkthrough A: Update an Existing Part/Assembly
Step A1: Attach an existing model
- Action:
1. Paste a valid local
.sldprtor.sldasmpath in Model path. 2. Optionally add feature targets such as@Boss-Extrude1. 3. Click Attach Local Path. - Screenshot callouts:
- callout 1: Model path textbox
- callout 2: Feature targets textbox
- callout 3: Attach Local Path button

Callout legend: ① Model path textbox — paste the full
.sldprt/.sldasmpath here. ② Feature targets textbox — optional grounded target such as@Boss-Extrude1. ③ Attach Local Path button — opens the model in the adapter and seeds family evidence.
- Expected state after action:
- workflow mode =
edit_existing - active model path = resolved file path
- active model status shows attached model name/type
- feature tree table populated after model connect/preview succeeds
Step A2: Generate planning context
- Action: 1. Click Refresh Clarifications. 2. Click Inspect More. 3. Click Plan Next Steps.
- Screenshot callouts:
- callout 1: Refresh Clarifications
- callout 2: Inspect More
- callout 3: Plan Next Steps
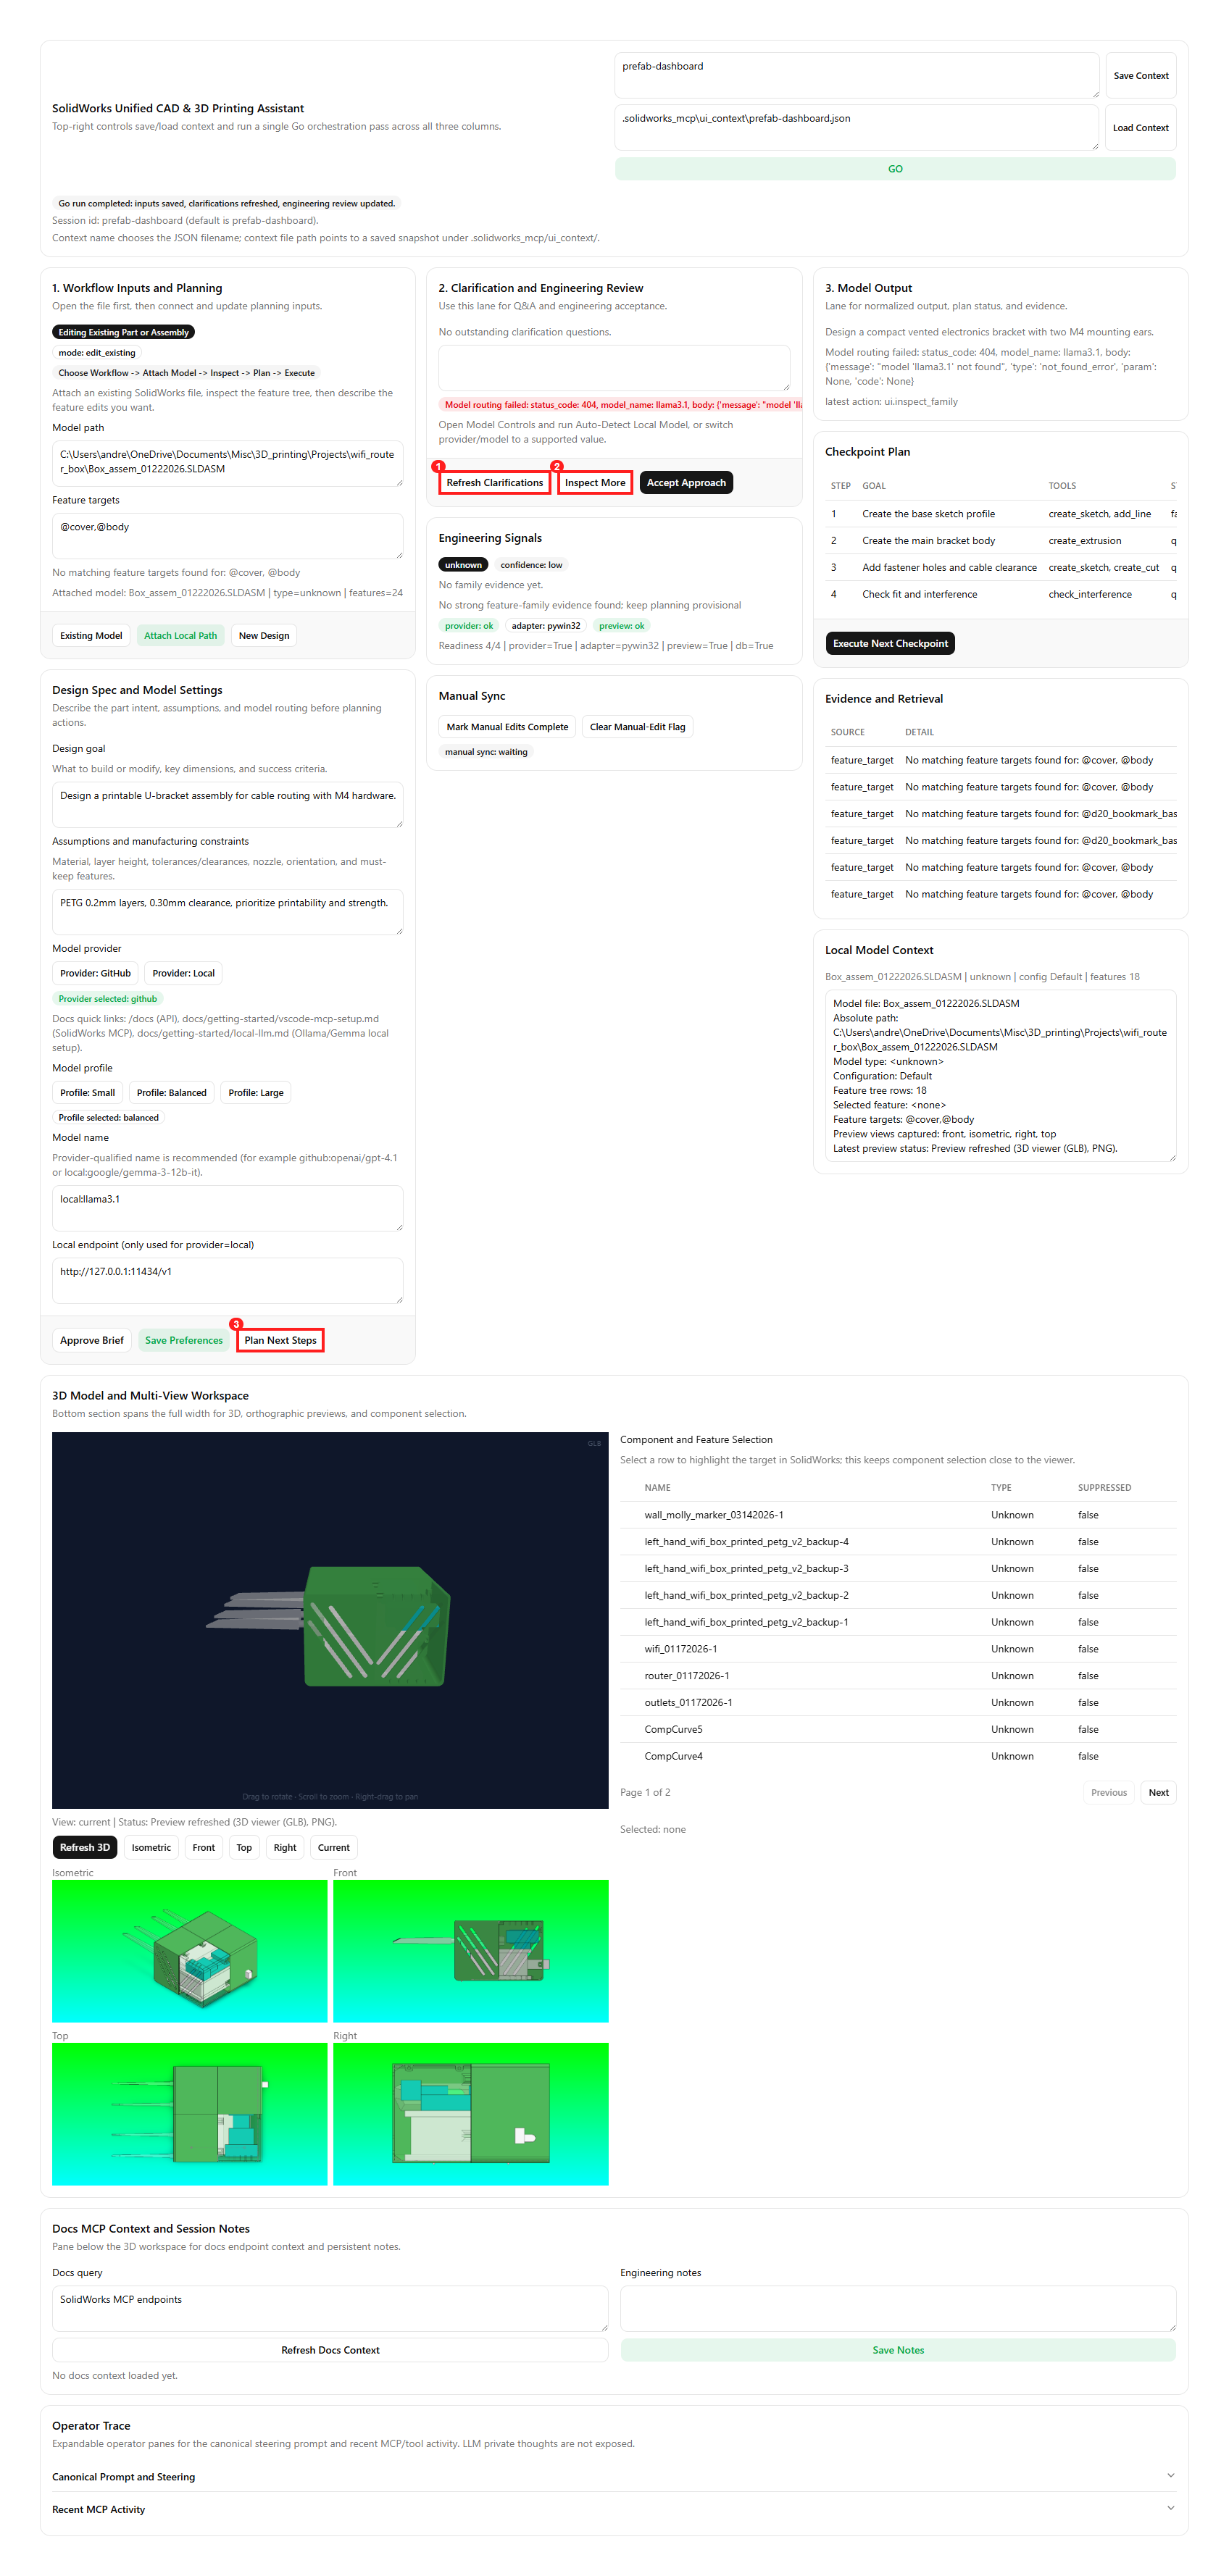
Callout legend: ① Refresh Clarifications — calls the planning agent to normalize the brief and surface follow-up questions. ② Inspect More — runs Feature-Tree-Reconstruction classification and generates checkpoints. ③ Plan Next Steps — refreshes the checkpoint queue with the latest model context.
- Expected state after action:
- clarifying questions text updated, or
latest_error_textexplains why clarification failed - proposed family/confidence/evidence updated, or family fields show fallback values (
unknown/low) with an explicit error - checkpoint plan rows updated (or refreshed)
Step A3: Execute and verify output
- Action: 1. Click Execute Next Checkpoint. 2. Click Refresh 3D and one orientation button (for example Isometric). 3. Click a feature row in the feature table. 4. In Manual Sync, click Mark Manual Edits Complete, then Run Diff and Reconcile.
- Screenshot callouts:
- callout 1: Execute Next Checkpoint
- callout 2: Refresh 3D + orientation controls
- callout 3: Feature table row
- callout 4: Manual Sync readiness toggle + reconcile button

Callout legend: ① Execute Next Checkpoint — runs the next queued step via the adapter (e.g.
create_sketch,create_extrusion). ② Refresh 3D + orientation controls — exports a PNG from SolidWorks at the chosen view. ③ Feature table row — click to select/highlight a feature in the active model. ④ Manual Sync readiness toggle + Run Diff and Reconcile — capture before/after snapshots and detect manual edits.
- Expected state after action:
- checkpoint row status transitions from queued to executed/failed/mocked
- preview status and images refresh
- selected feature label updates
Walkthrough B: Start a New Part Design
Step B1: Hard reset into new-design flow
- Action: 1. Click New Design in lane 1.
- Screenshot callouts:
- callout 1: New Design button
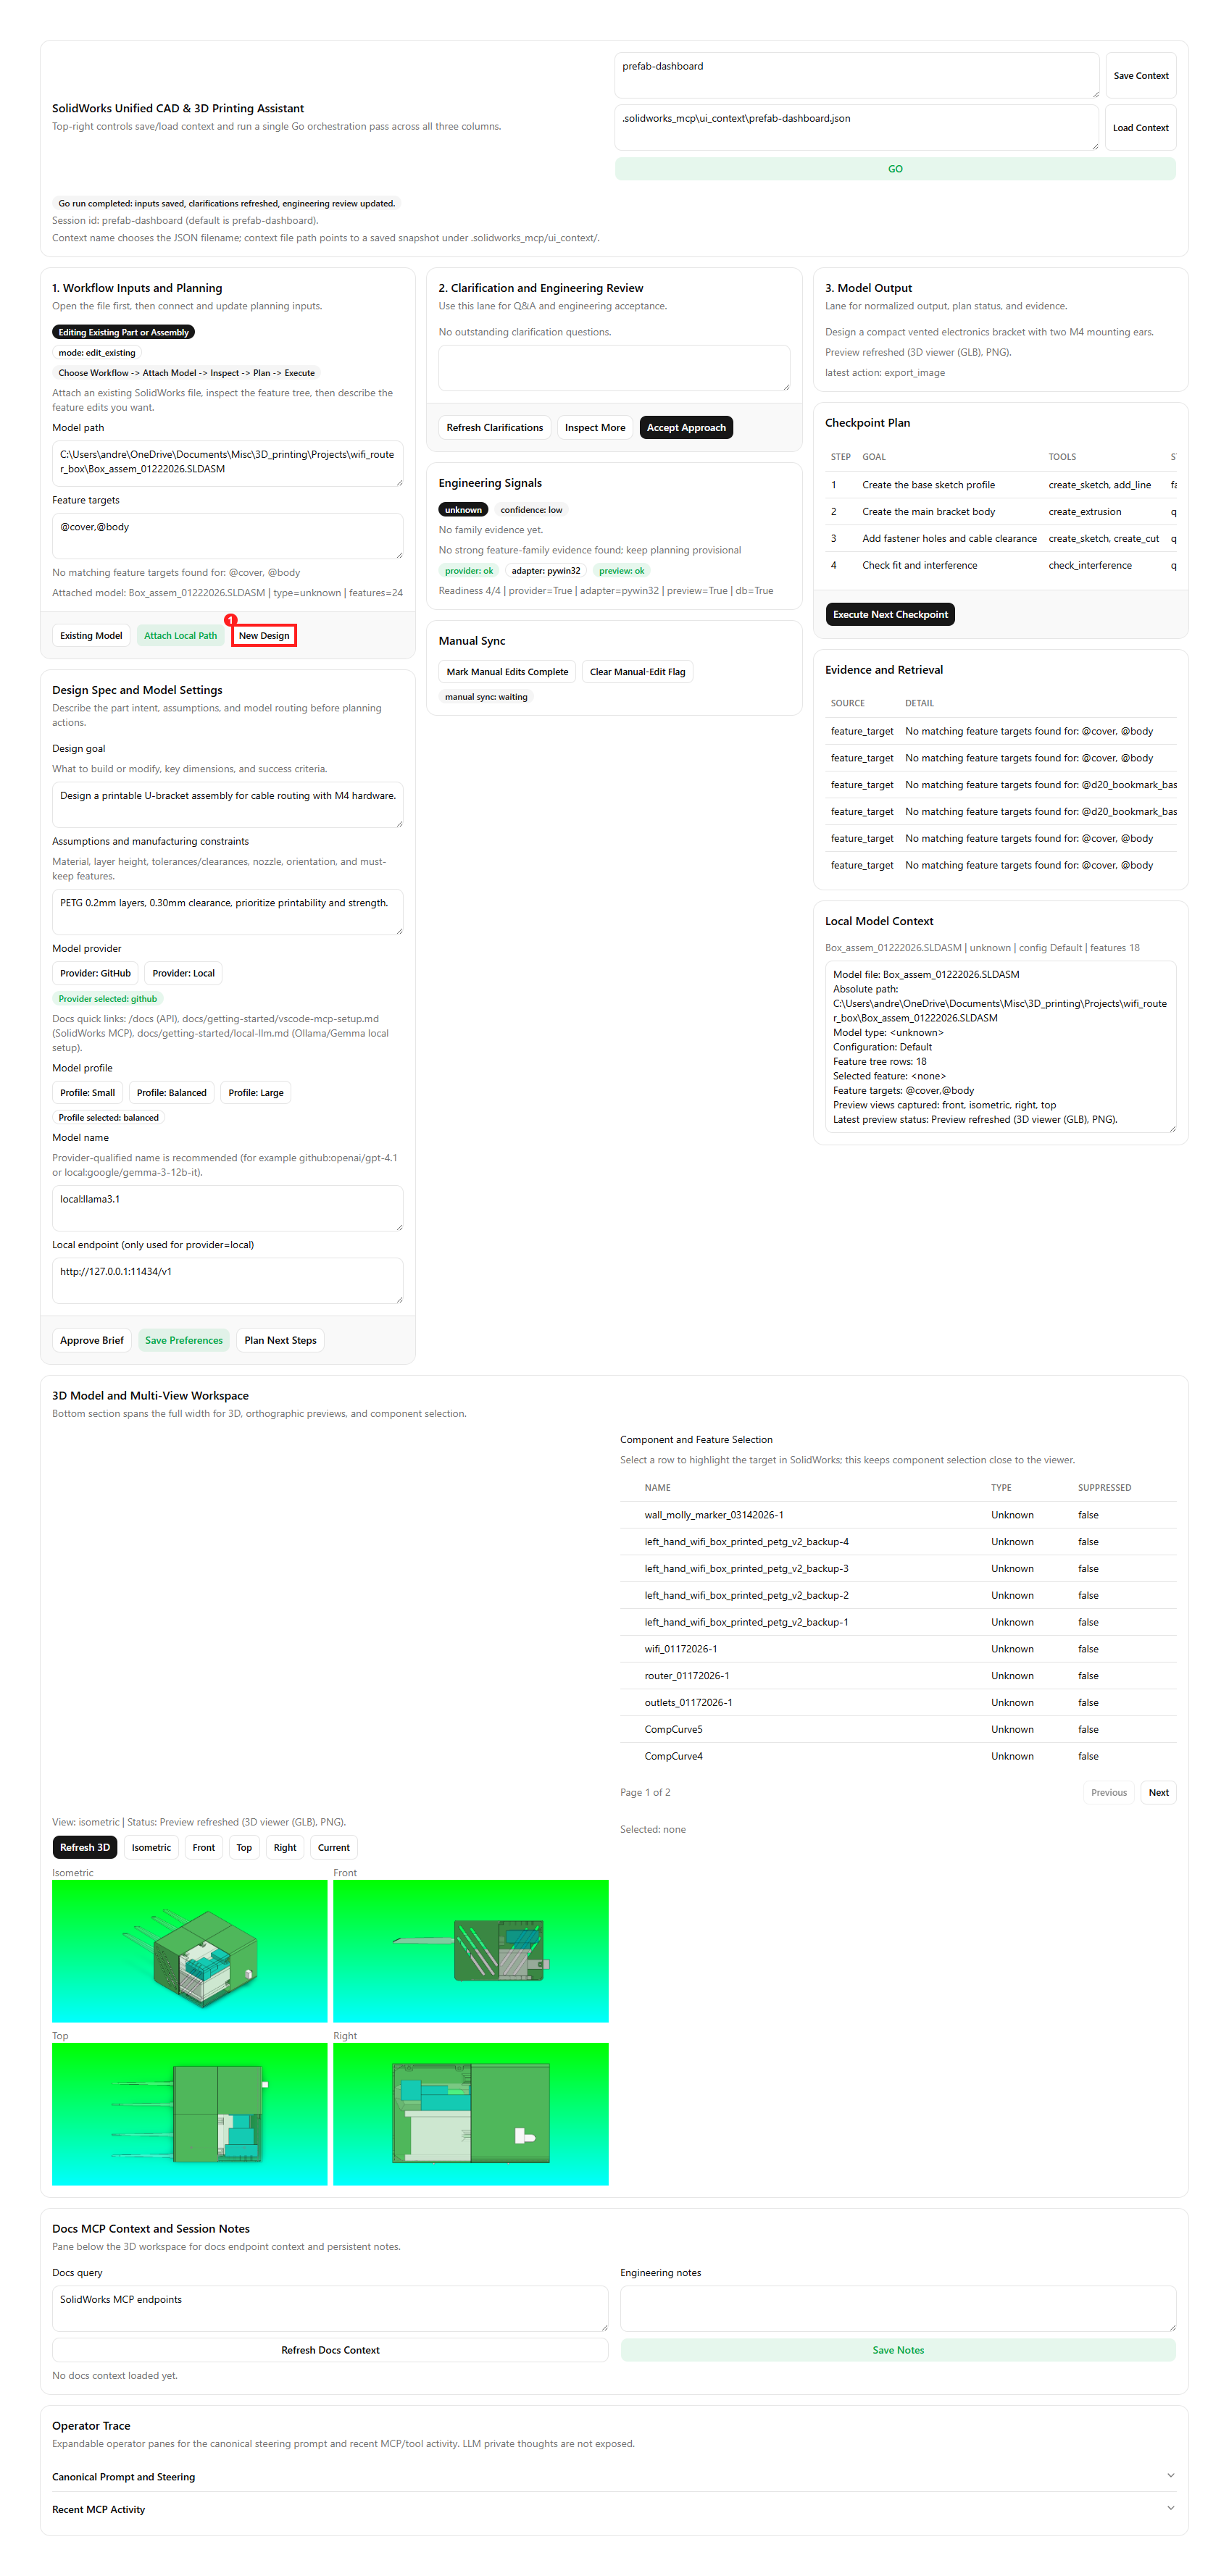
Callout legend: ① New Design button — clears all session state (model path, family, checkpoints, evidence) and sets workflow mode to
new_design.
- Expected state after action:
- workflow mode =
new_design - active model path/status cleared
- feature target text/status cleared
- clarifications answer cleared
- family classification reset to unclassified/pending
- preview status reset to no preview captured
- checkpoint execution statuses reset to queued
- local model context summary resets to
<none> | unknown | config <unknown> | features 0 - evidence table clears in the clean new-design state
Step B2: Define fresh design intent
- Action: 1. Enter a new goal in Design Spec. 2. Enter assumptions and model settings. 3. Click Approve Brief, then Save Preferences.
- Screenshot callouts:
- callout 1: Design goal textbox
- callout 2: Assumptions textbox
- callout 3: Approve Brief and Save Preferences buttons
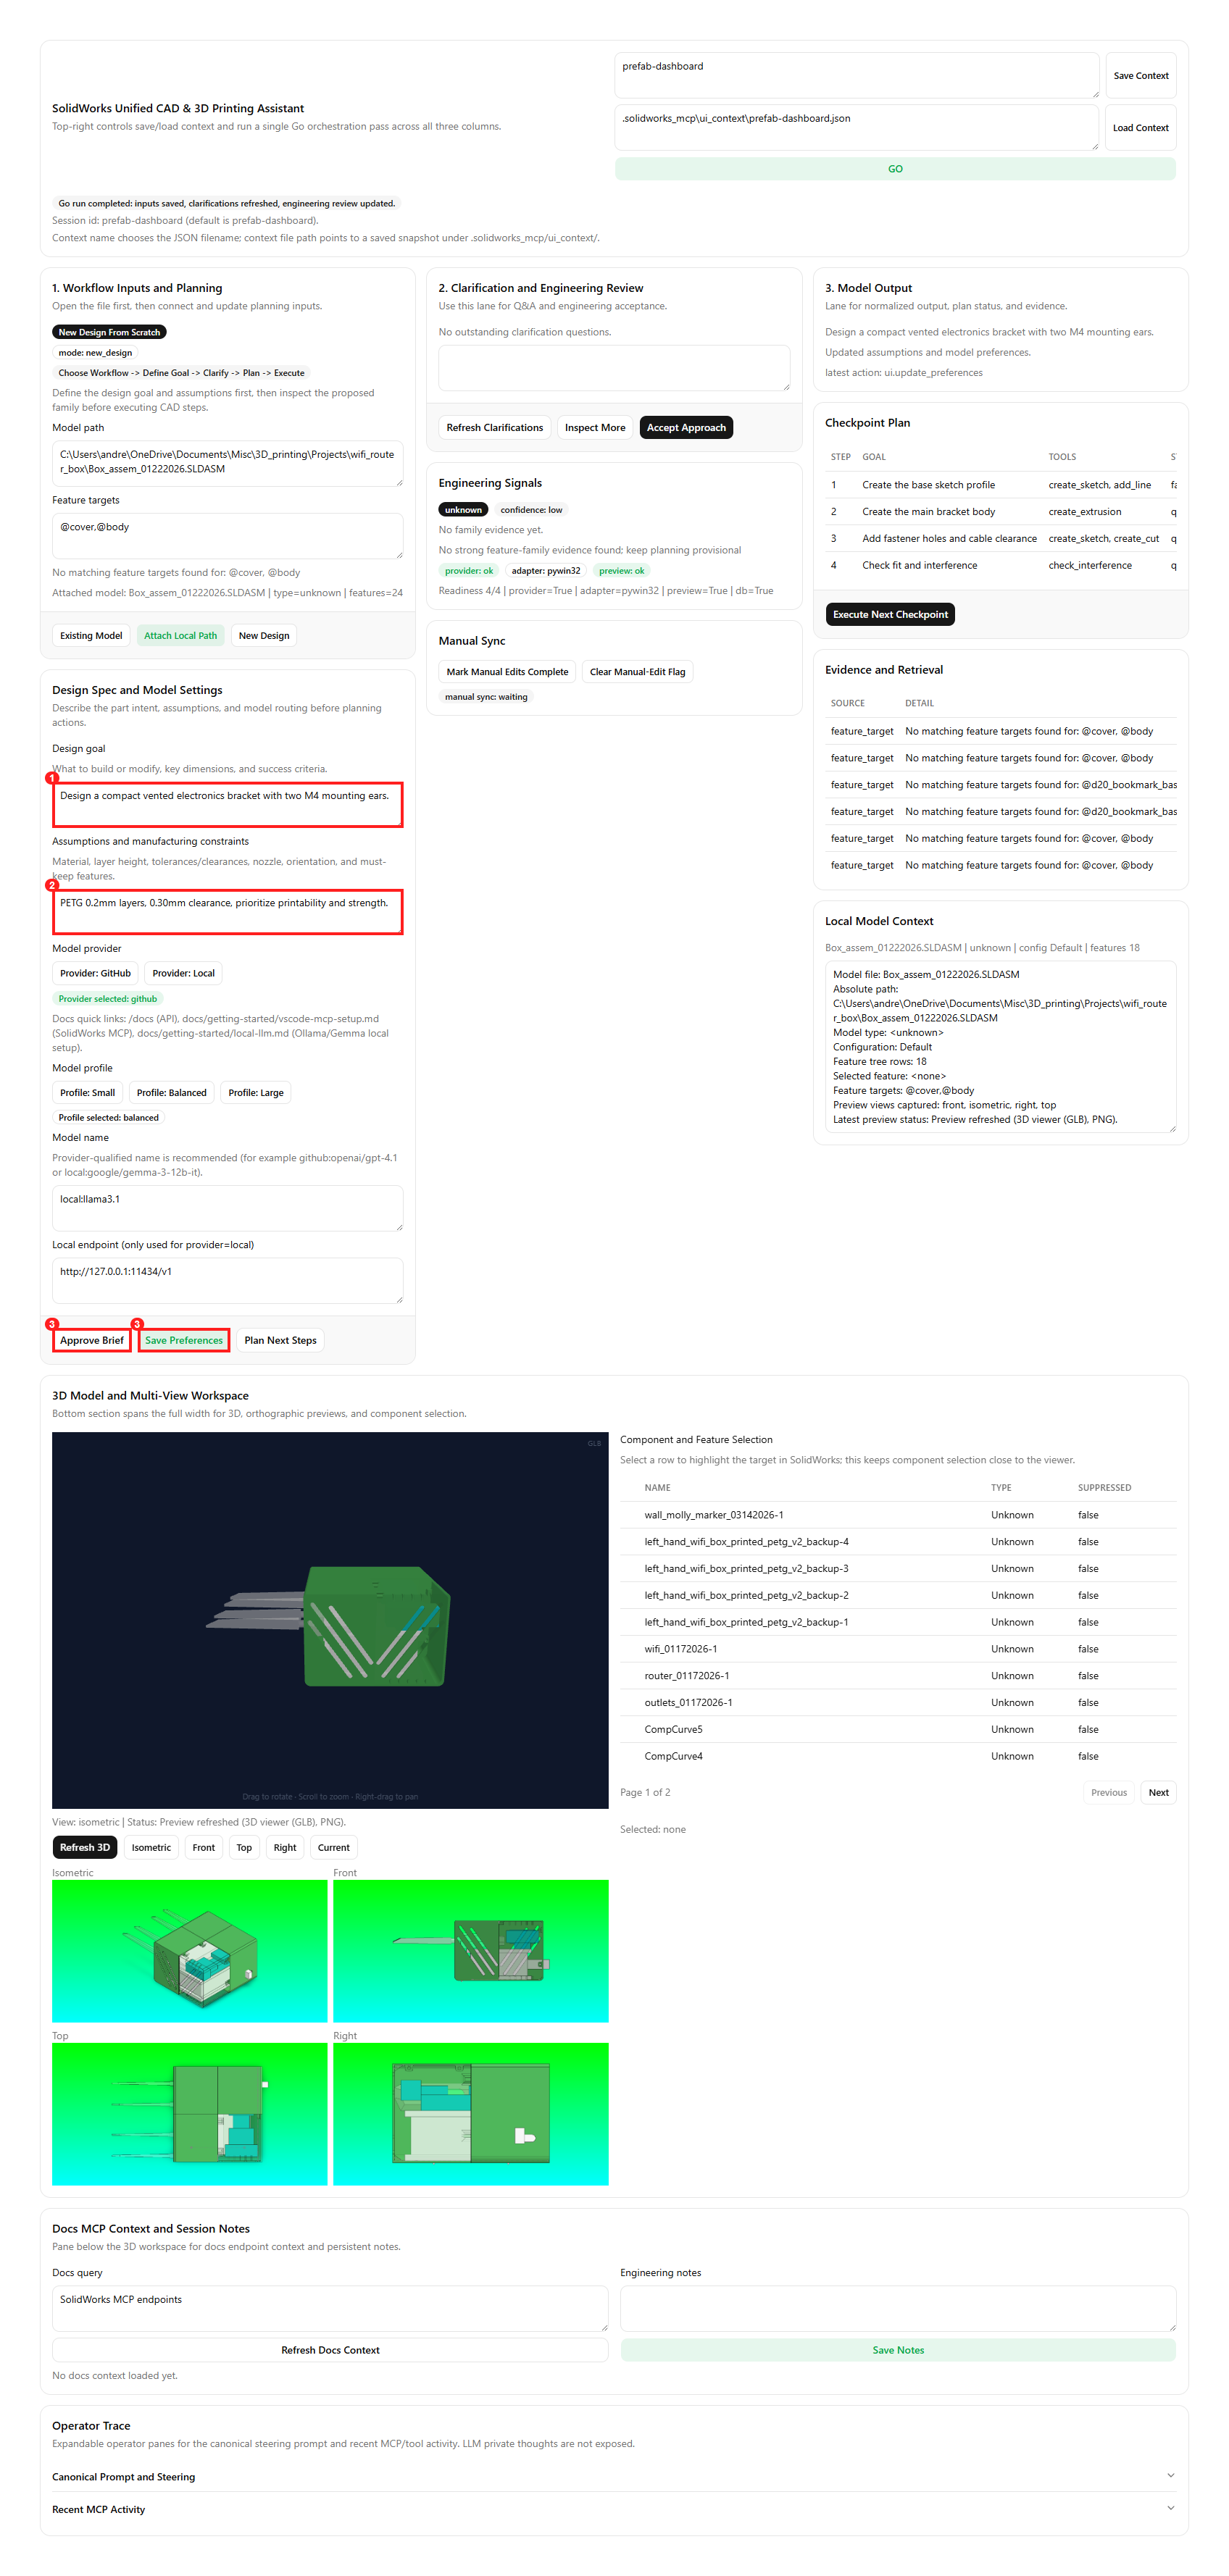
Callout legend: ① Design goal textbox — describe the target outcome with dimensions and success criteria. ② Assumptions textbox — enter material, layer height, nozzle, clearance targets, and orientation constraints. ③ Approve Brief — persists the goal into the session. Save Preferences — stores provider/profile/model/endpoint choices.
- Expected state after action:
- normalized brief reflects the new goal
- latest message confirms brief and/or preferences save
- provider/profile badges match selected values
Step B3: Plan and execute first pass
- Action: 1. Click GO or run Refresh Clarifications + Inspect More. 2. Review Engineering Signals. 3. Click Execute Next Checkpoint.
- Screenshot callouts:
- callout 1: GO button
- callout 2: Engineering Signals card
- callout 3: Execute Next Checkpoint button
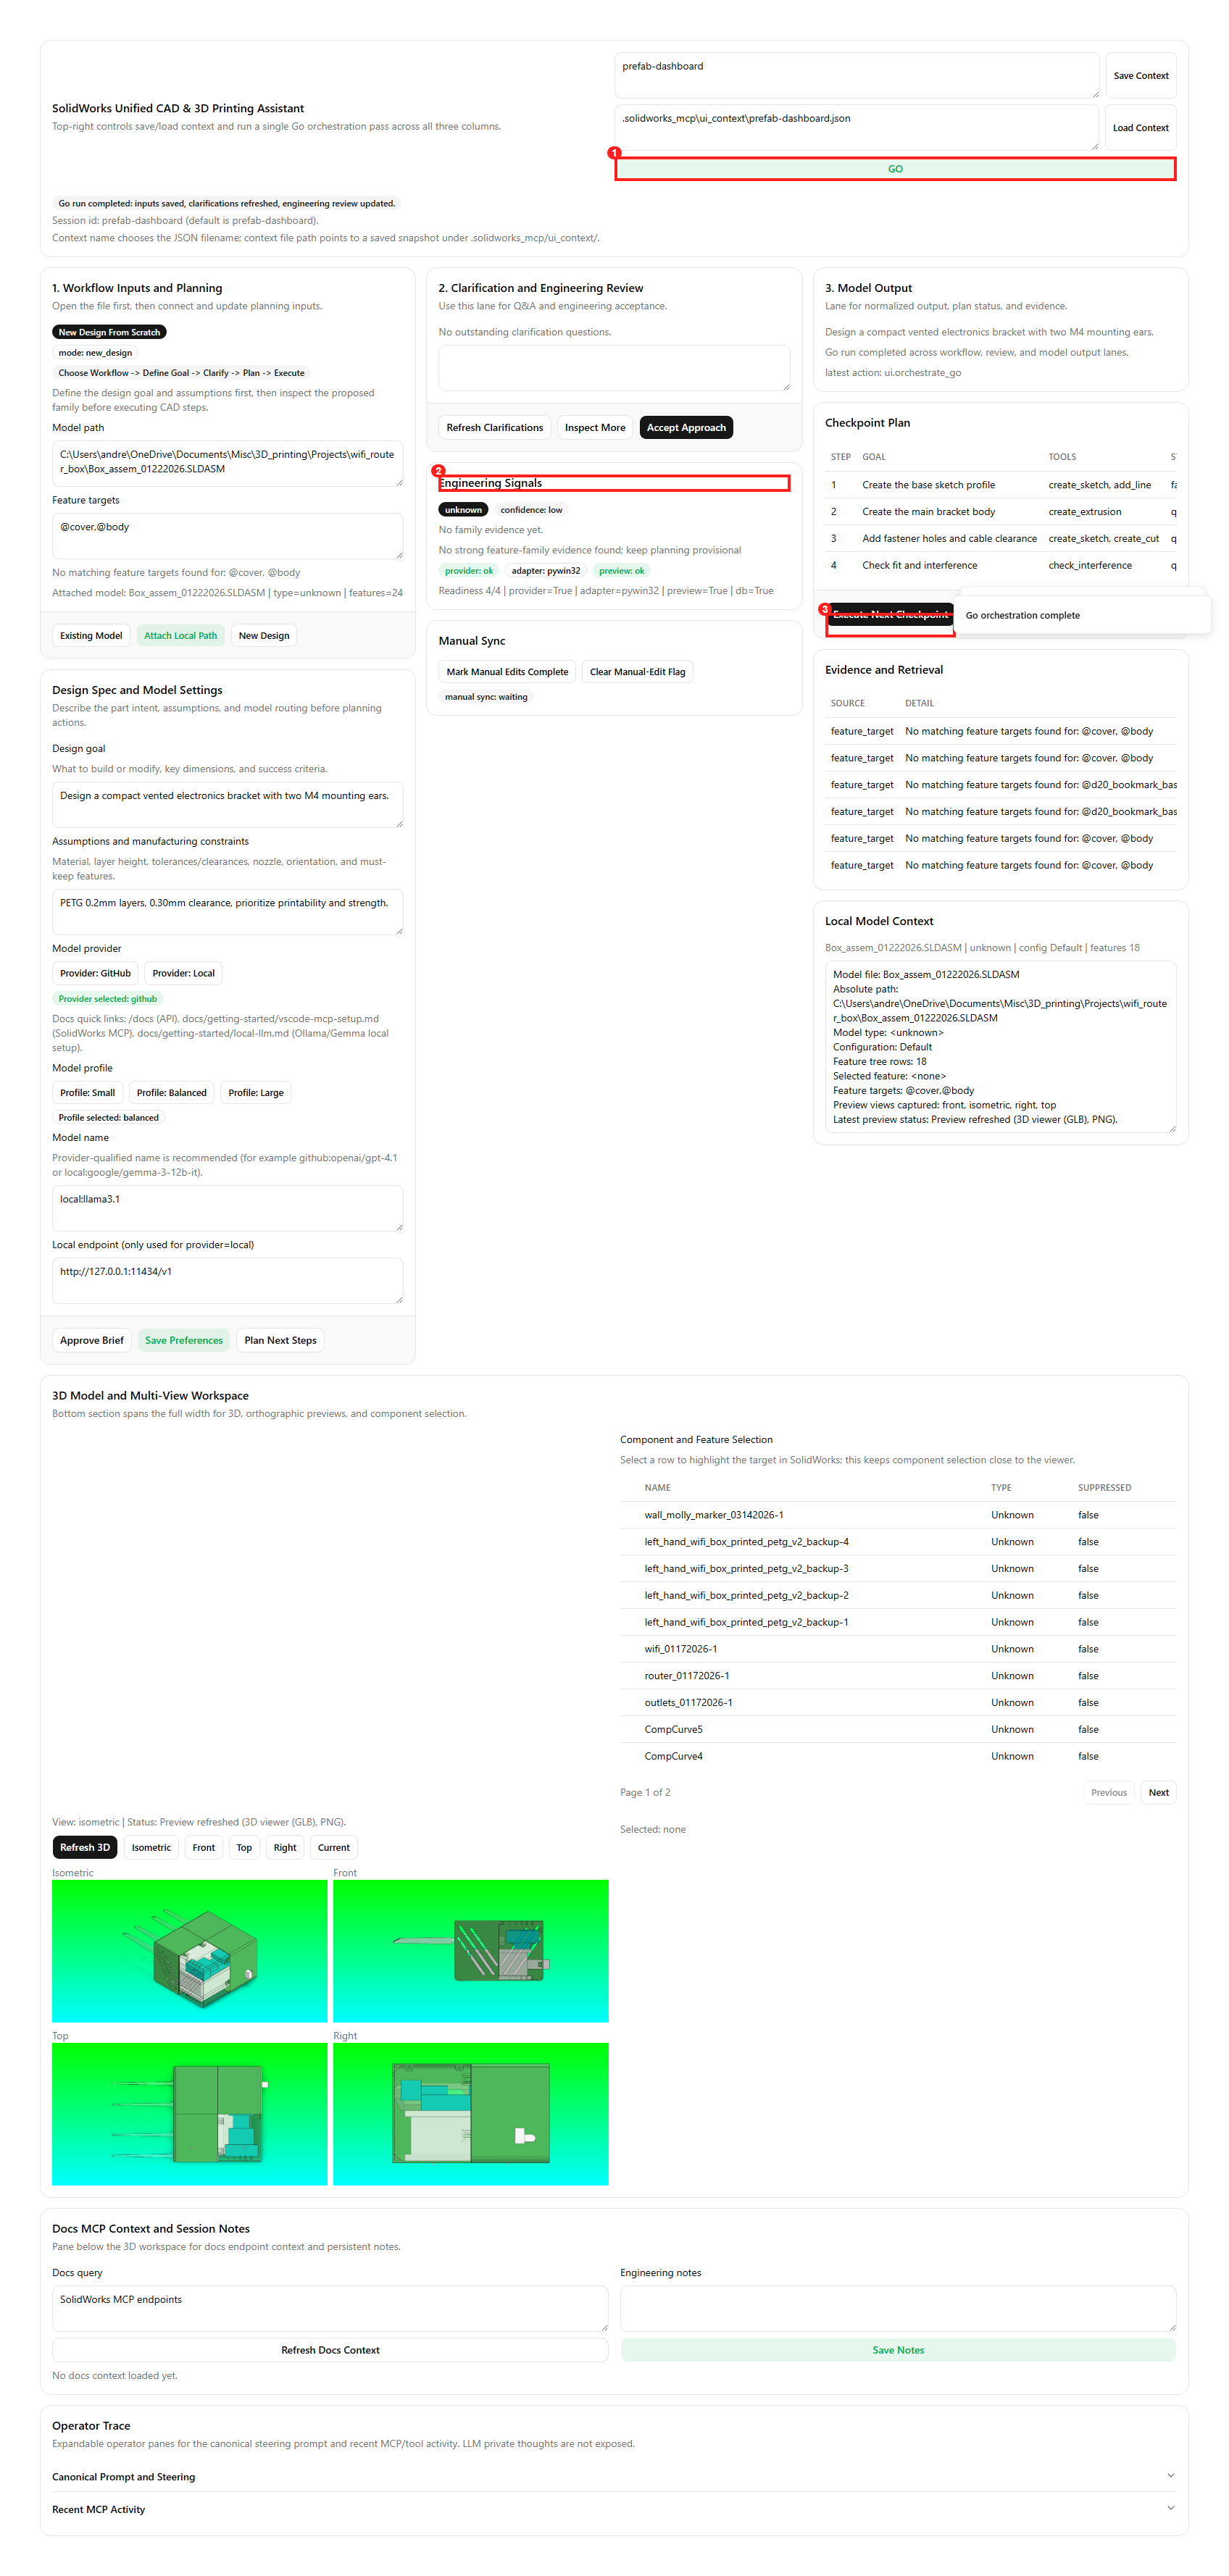
Callout legend: ① GO button — runs Clarify + Inspect in one shot to populate the brief, family, and checkpoint queue. ② Engineering Signals card — shows readiness summary, active model context, and latest error/remediation. ③ Execute Next Checkpoint — starts execution of the first generated checkpoint step.
- Expected state after action:
- clarification and family outputs reflect the new goal (or show a recoverable routing/model error)
- readiness summary updates
- first checkpoint status updates from queued to executed/failed/mocked
Troubleshooting while validating walkthroughs
- If
New Designdoes not clear model/evidence context, confirm you are connected to the latest backend process and restartdev-ui. - If clarification/family steps return model errors (for example model not found), update provider/profile/model settings and retry.
Screenshot file naming convention
Store walkthrough screenshots under docs/assets/prefab-ui/ using this pattern:
walkthrough-a1-attach-existing.pngwalkthrough-a2-plan-existing.pngwalkthrough-a3-execute-existing.pngwalkthrough-b1-new-design-reset.pngwalkthrough-b2-new-design-inputs.pngwalkthrough-b3-new-design-execute.png
Notes
- This dashboard is primarily a planning and verification tool right now, not a fully automated modeling assistant.
- Checkpoint execution runs supported adapter tools now, with unsupported tools explicitly labeled
MOCKED. - Preview images use
export_image(view_orientation=...)from the existing tool surface; no embedded COM viewport streaming yet.